Bambu Lab have officially announced the launch of their new multi-material 3D printer, the Bambu Lab H2C, taking place on 18 November 2025 at 3:00 PM CET—and I’ll be there at Formnext in Frankfurt to witness the reveal in person.
This is shaping up to be one of the most significant announcements in desktop 3D printing for years.
For the past three years, Bambu Lab have been working on a cleaner, more efficient approach to multi-colour and multi-material printing. Their teaser hints at something genuinely ground-breaking: the end of purge waste.
Back in 2022, the X1 series opened the door to accessible multi-colour printing, but the trade-off was always the same—purging. Endless little strings of wasted filament, time lost, and the compromises that every multi-colour printer still struggles with today.
Bambu’s engineers zeroed in on the real culprit: contamination within the hotend. Their solution? Don’t purge—swap the hotend.
Image and Video Credit: Bambulab
Introducing the Vortec Hotend Change System
The H2C is expected to showcase a brand-new technology called Vortec, described as one of the first induction-heated, fully automated hotend-swap systems.
The innovations highlighted in the teaser include:
• Dedicated hotends instead of purging
Like using a fresh paintbrush for each colour. No cleaning required, no cross-contamination, and no filament waste.
• Induction heating in just 8 seconds
Rapid heating without the slowdown of bulky toolheads or complex gantries.
• Wireless data and power sync
Each hotend contains its own chip that communicates temperature, filament data and status to the printer—without cables or pogo pins to wear out.
• No sacrifice in speed, volume or reliability
Rather than adding multiple nozzles or loading a heavy toolhead, Bambu Lab have focused on keeping things fast, compact and robust.
According to Bambu Lab, Vortec represents “the epilogue to the imperfections of X1” and marks their first major step toward eliminating purge altogether.
I’ll Be Reporting Live from Formnext
As The Gadget Man, I’ll be on the ground at Formnext in Frankfurt when the H2C is unveiled. Expect hands-on impressions, photos, early thoughts and—as always—my honest take on whether this could be the next revolution in multi-material 3D printing.
Stay tuned. This could be the moment multi-colour printing finally becomes clean, fast and… uncompromising.
From Manual Filament Swapping to Automatic Colour Changes: Ender 3 vs Anycubic Kobra S1 Combo
As someone who’s had the opportunity to tinker with various 3D printers over the years, I’ve experienced both the joys and frustrations of colour swapping during prints. My journey started with manual filament swaps on the Ender 3, and now I’ve moved on to the seamless (albeit not waste-free) world of automatic colour swapping on the Anycubic Kobra S1 Combo. Let’s dive into the key differences between these two approaches and the lessons I’ve learned along the way.
Manual Filament Swapping on the Ender 3
The Ender 3 is a fantastic workhorse for beginners and enthusiasts alike. However, when it comes to multi-colour printing, you’re limited to manual filament swaps, which can only be done at specific layer heights. While this technique is simple in concept, it comes with its own set of challenges:
How It Works
Design the model with clear layer divisions for each colour.
Use your slicer software (e.g., Cura) to insert filament change commands (commonly M600 G-code) at the desired layer height.
Monitor the printer closely and manually swap the filament when prompted.
Restart the print after the filament is loaded.
Advantages
Cost-Effective: No need for additional hardware or upgrades.
Straightforward: Simple to set up with basic slicer adjustments.
Customisation: Allows for precise colour placement, as long as changes align with flat layers.
Challenges
Time-Consuming: You must stay near the printer to swap filament, especially for prints with multiple transitions.
Limited to Layers: Colour changes are restricted to flat transitions between layers, making it unsuitable for gradient or complex designs.
Risk of Errors: Improper filament loading or extrusion can result in print failures or layer inconsistencies.
The Ender 3 is a simple “bed slinger” design, where the print bed moves along the Y-axis during printing. This makes it easy to understand and maintain but limits its speed and precision compared to more advanced designs. Manual filament swaps on the Ender 3 are a rewarding challenge, but they’re not ideal for prints requiring frequent or intricate colour changes.
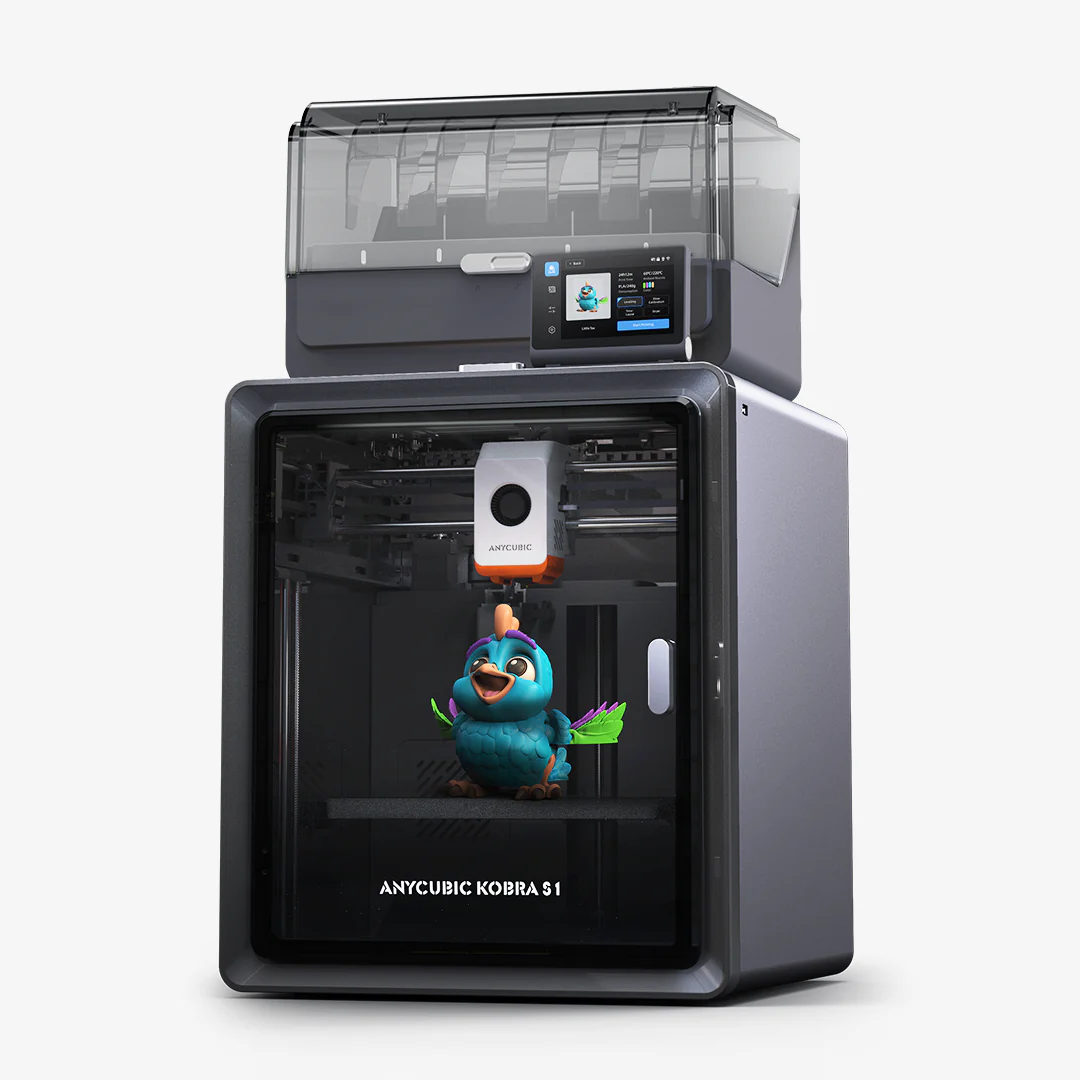
Automatic Colour Swapping on the Anycubic Kobra S1 Combo
Enter the Anycubic Kobra S1 Combo, a machine that takes the hassle out of colour transitions with its automatic colour swapping capabilities. This feature is a game-changer for multi-colour printing, but it’s not without its quirks.
How It Works
Load multiple filaments into the system’s multi-material module.
Use your slicer software to assign colours or materials to specific parts of the model.
The printer automatically purges and swaps filaments as required during the print.
Advantages
Full Automation: No need to monitor the printer for manual swaps.
Flexible Design: Supports intricate, multi-colour models and even gradient effects.
Time-Saving: Once the print starts, you can walk away and let the machine handle transitions.
Advanced Features: Comes with a four-reel filament holder, filament drying capabilities (ACE Pro), and a completely enclosed design with a self-levelling bed for precision and consistency.
Core-X-Y Design: The Kobra S1 uses a core-X-Y motion system, where the print head moves along the X and Y axes, while the bed remains stationary in those directions and only moves along the Z-axis. This design allows for faster and more precise printing.
Speed: Prints significantly quicker than the Ender 3, reducing overall production time.
Challenges
Purge Waste: Automatic colour swaps generate significant purge waste, especially for frequent transitions. This waste can be a mix of materials and colours, making it harder to recycle.
Material Costs: Increased waste also means higher filament consumption, which can add up over time.
Complexity: The Kobra S1 Combo’s advanced features and capabilities make it a more complex machine to operate and maintain, compared to the hands-on simplicity of the Ender 3.
Calibration Required: Achieving perfect transitions may require fine-tuning slicer settings and calibration.
Despite these challenges, the Kobra S1 Combo excels at delivering high-quality multi-colour prints with minimal effort compared to manual methods.
Key Comparisons
Feature
Ender 3 (Manual Swaps)
Anycubic Kobra S1 Combo (Automatic)
Ease of Use
Labour-intensive
Fully automated
Print Complexity
Limited to layer changes
Supports gradients and intricate designs
Material Waste
Minimal
Significant purge waste
Time Investment
High (requires supervision)
Low (set and forget)
Cost Efficiency
More cost-effective
Higher filament consumption
Learning Curve
Simple to learn
Requires slicer and printer calibration
Features
Basic setup
Four-reel holder, filament dryer, enclosed design, self-levelling bed, Core-X-Y system
Speed
Slower print times
Significantly faster
Which System Is Right for You?
The choice between manual and automatic filament swapping depends largely on your needs:
Creality Ender 3
Ender 3: Ideal for budget-conscious users who don’t mind putting in extra effort to achieve basic multi-colour prints. It’s a hands-on machine that’s perfect for learning and tinkering.
Anycubic Kobra S1 Combo
Anycubic Kobra S1 Combo: Perfect for users looking for convenience and the ability to create complex, high-quality multi-colour designs with minimal manual intervention. Its advanced features make it a powerful tool but with added complexity.
For me, moving to the Kobra S1 Combo has been a revelation. The convenience of automatic colour swapping far outweighs the challenges of purge waste and calibration. That said, the Ender 3 taught me valuable skills and patience, which I still draw upon when troubleshooting more advanced systems.
Final Thoughts
Transitioning from manual to automatic colour swapping is like moving from a bicycle to a car—both get you to your destination, but the experience is vastly different. The Ender 3 is a great starting point for learning the fundamentals of 3D printing, while the Anycubic Kobra S1 Combo opens up a world of possibilities for complex, multi-colour creations.
If you’ve been hesitant to make the leap to automatic systems, consider this: while there’s no substitute for learning the basics, automation can free up your time to focus on what really matters—creating amazing prints.
What’s your experience with colour swapping in 3D printing? I’d love to hear your thoughts in the comments below!
If you are thinking of buying a Anycubic printer, use the discount code MATTPORTER when you check out to receive a £20 discount.